Storing Fruits and Vegetables: A Basic Look at the Options and the Necessary vs. Unnecessary Tools
Storing Vegetables and Fruits: The Basics
Simple, Frugal, and Effective Ways
If you’ve ever wondered how to make your homegrown produce last through the season, you’re in the right place! Storing fruits and vegetables doesn’t have to be overwhelming. With a few simple techniques and tools, you can enjoy the rewards of your garden for months. Let’s dig in (pun intended)! From potatoes to tomatoes and beyond, we’ll explore practical ways to preserve your harvest without fuss or unnecessary expense.
Why Storing Vegetables and Fruits Matters
The beauty of growing your own food is having fresh, nutritious produce at your fingertips, ideally from one harvest to the next. But unless you live in a year-round growing climate, preserving your bounty is essential. Whether it’s zone 3 winters or limited storage space, every gardener faces challenges. By choosing simple, frugal storage methods, you can keep your produce fresh longer and reduce waste.
For me, frugality is key. I love finding ways to reuse, upcycle, and save money. But there are times when investing in quality tools makes a world of difference. When it comes to storing your harvest, having the right supplies is just as important as the techniques you use. Think of it as setting yourself up for success—start collecting now, watch for sales, or use my affiliate links to find the best deals. The goal? Tools that work for you and your budget.
Here’s a look at four practical storage methods and the essentials you’ll need to get started. Which method will suit your needs? That will depend on your garden goals.

Learn simple, low-fuss gardening tips to help you grow more food with less effort. Whether you're a beginner or an experienced gardener, this video will show you basic ways to store your harvest and the tools you can skip to keep things simple.
1. Freezing: A Quick and Simple Solution
Freezing is one of the easiest ways to preserve vegetables and fruits, but it’s not ideal for everything. If freezer space is limited, don’t worry—there are other options! That said, investing in a good freezer is worth considering. A reliable freezer is a long-term investment that can pay off in reduced food waste and convenience.
Tips for Freezing Vegetables:
Skip fancy gadgets. Zip-top bags work perfectly, and you can use your lips to create an airtight seal. Practical and free!
Blanching vegetables before freezing is often recommended to maintain texture and nutrients, but it’s not always necessary. For instance, peas freeze beautifully without blanching, saving you time.
Avoid frozen clumps by using a towel to par-freeze veggies before bagging them. (If you’ve seen my video, you know how simple this method is!)
Shred potatoes for hash browns or double-stuffed potatoes for quick meals. Whole potatoes, however, don’t freeze well and tend to turn mealy.
Tips for Freezing Fruits:
Flash-freeze berries on a tray before transferring them to bags. This prevents clumping.
Make freezer jam by mashing berries with sugar—no cooking required!
Frozen grapes and blueberries are quick, delicious snacks. Just pop them in a bowl and enjoy.
Personal tip: When we started freezing food, we bought a second-hand freezer to save money. After losing an entire side of beef due to a breakdown, we realized the importance of investing in quality. Learn from my mistake—a dependable freezer is worth it!
2. Root Cellaring and Cold Storage
For long-term storage, nothing beats the simplicity of a root cellar or cold room. Even if you don’t have a traditional root cellar, there are plenty of creative alternatives to explore.
Vegetables That Store Well as Is:
Squash: Keep the stems long for better storage. If grown and stored properly, squash can last until your next harvest.
Potatoes: Store unwashed—the dirt acts as a natural preservative. Bonus: Sprouted potatoes can be used as seeds for next year’s crop.
Onions and Garlic: Cure them before storage to extend their shelf life. Be vigilant about removing any spoiled ones—you’ll smell them before you see them!
Seeds: Save seeds from grains or vegetables for planting next year or grinding into flour. (More on this in a future blog!)
Creative Ideas for Cold Storage:
Use sand or sawdust to preserve root crops like carrots.
Partner with a gardening friend who has extra storage space. I’ve done this, and it’s a win-win.
Turn an old doghouse or a cool garage into makeshift storage. Just avoid areas with strong odors like gasoline—those smells can seep into your food.
Leave root vegetables in the ground! If your climate allows, this is the easiest option. Just be prepared with a sturdy shovel when the ground freezes.
The idea of burying a bus and filling it with food sounds like a fun project worth trying!
Today’s information highway is full of ingenious ideas from creative people building their own fruit and vegetable storage 'units.' If this is the route for you, there are many to explore. I don’t have a specific recommendation (not my lane!), but if I do, I’ll update this!
For book lovers, I highly recommend Root Cellaring by Mike and Nancy Bubel. It’s a fantastic journey into storing options. Check it out here!
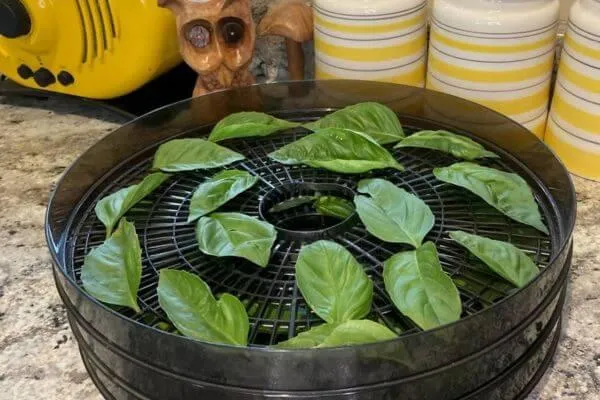
3. Dehydrating: Lightweight and Versatile
Dehydrating is an excellent way to save space while preserving the nutrients and flavors of your produce. Whether you use a high-end dehydrator or a DIY setup, this method is both flexible and effective.
Pro Tips for Dehydrating:
1) Keep Herbs Whole:
Store herbs whole to retain flavour and potency longer. Grind then only when you're ready to use them.
2) Make Powders:
Dehydrated produce can be powdered for versatile use. Tomato powder, for instance, can easily transform into paste, sauce or juice, depending on how much water you add. Celery leaves, garlic, herbs, and foraged foods can be turned into potent powders that for many uses.
3) The List is Endless:
Kale, broccoli leaves, your weeds as medicine, roots, fruit leathers, carrot tops, onion skins, onions…
DIY Hacks:
1) Use household items like coat hangers with string or cooling racks as drying racks.
These simple tools can make all the difference when drying your goods.

Baby gate turned into an effective drying rack—simple, practical, and perfect for drying herbs with ease!
2) Store dehydrated goods in jars, resealable bags, or repurposed containers.
Experiment with different options to see what works best for you.
Bonus Tip:
Dehydrated strawberries are a sweet, nutritious treat, perfect for cereals or snacks. If you haven't tried dehydrating strawberries yet, you're in for a treat!
If you're after a boring but reliable dehydrator, this isn’t it. My own style is only found second-hand, but here’s a modern alternative that’s a close match. It’s more high-tech than mine, but it does the job! See my 2nd choice here.
Honest Truth:
There are also freeze dryers on the market, and they’re a long-term option—great for storing food for future use. However, we don’t have one. Frugal Erin says… our food grows yearly, and while freeze-drying is cool, it’s pricey, then you’ve got bags and “don’t eat this” packages to contend with. The storage size and weight are great... Maybe one day, but not today.
4. Canning: The Gold Standard
Canning requires more effort upfront but yields long-lasting results. From salsas to soups, pickles to sauces, canned goods are a pantry staple that lets you enjoy your garden’s bounty year-round.
Supplies to Get Started:
Pressure Canners:
Essential for low-acid foods like vegetables and meats. Whether you choose stovetop or electric, be sure to follow safety guidelines carefully..
Water Bath Canners:
Ideal for high-acid foods like jams and pickles. These are often affordable and easy to find second-hand.
Jars and Lids:
Check jars for chips and always stock up on new lids. An emergency stash is always a good idea. The
Canning Kit: (see link above)
Tools like jar lifters and funnels make the process much easier. Once you try them, you’ll never look back!
HOT TIP: Before you begin, make sure all your lids and rings match the jar size. Rings are mandatory for processing. After cooling down, you can reuse the rings for the next batch.
Many of these items can be found at garage sales and second-hand stores. Keep your eyes peeled! However, I don’t recommend buying a second-hand pressure canner unless you know how to inspect it. If you’d prefer to buy new supplies, I invite you to use my Amazon links to get the supplies you need. I do receive a commission off of sales at no extra cost to you. If you choose new, thank you for supporting my mission to bring gardening back to the basics!
5. Fermenting: A Flavorful Adventure
I’ll admit, fermenting isn’t my lane, but it is a very healthy option. I wish we liked fermented foods! I believe in speaking only on what I know. If fermentation interests you, let me know, and I’ll recruit a guest speaker who can fill in the gaps in the Thrive Tribe.
The Thrive Tribe live calls are perfect for diving into topics like this, where you can ask questions and get real-time answers.
Final Thoughts
Creative storage may be necessary. Everything listed could be found used, and shopping second-hand can help you save money while getting the tools you need. This blog was meant to give insight into the options available. Preserving your harvest doesn’t have to be complicated or expensive. With a bit of planning and the right tools, you can enjoy the fruits (and vegetables) of your labour all year long. Start with what works for you, and remember—it’s okay to experiment. Each method has its benefits, and there’s no one-size-fits-all solution.
Shop used first, and only buy new if necessary (you can always find great tools from me!). Your storage options should align with your garden goals and your budget. Which method will you try first? You don’t have to implement everything in year one—but it’s good to experiment and see what works best for you. I’m here to help you grow, store, and enjoy more food with less fuss by educating simply.
This blog has been edited down to this. It was much, much longer! And that’s why I’ll end every blog with this: there’s always more to say!
Visit our website to Grow More Food with Less Fuss!
Until next time, happy growing!
Erin
